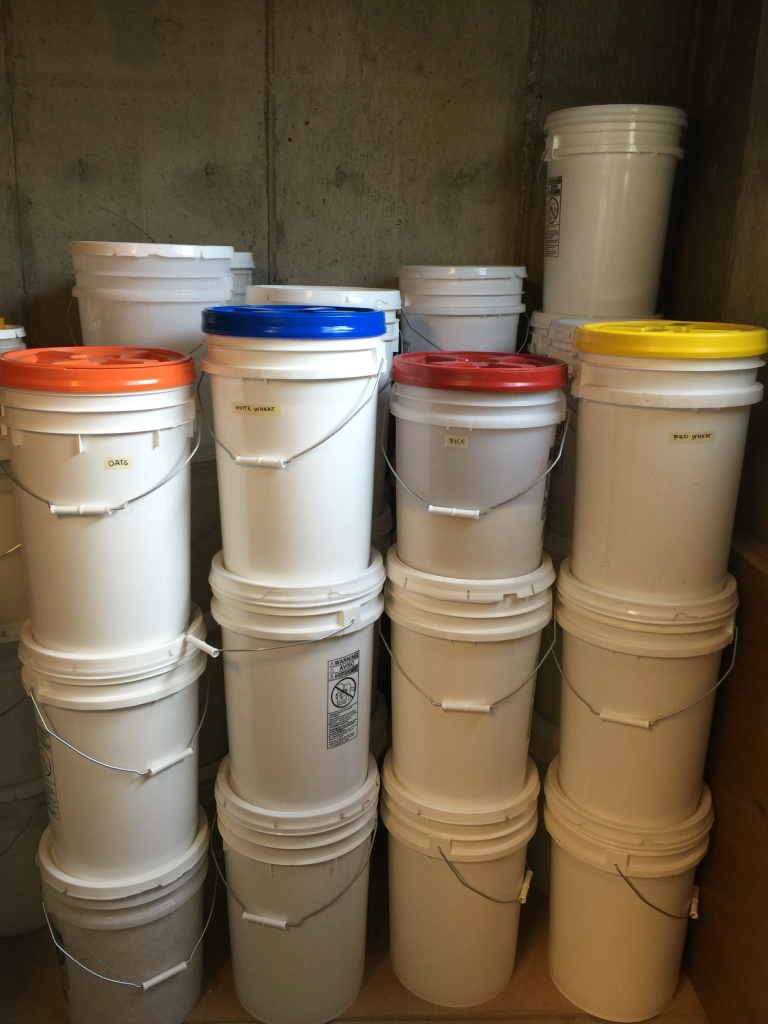
Is the idea of getting a year's supply of food storage for your family an overwhelming thought? I've come up with a simple solution for storing long-term food (well, it's how I store my food anyway). No more calculating how many pounds of grain are needed per person per year, etc. I've been using this system for about 4 years now and it's worked wonderfully!
I consider 3 parts to my food storage:
- 3-month supply of pantry items (or canned goods)
- 1-year supply of grains in buckets
- 1-year supply of miscellaneous items in #10 cans
Now, do I really know if this would last EXACTLY 1 year or 3 months? No. I just know that it will last a while - a long while which is all I'm really concerned about at this point.
So, let's start with the 3-month supply of my pantry items:
Yes, this is downstairs in my storage room as my kitchen didn't come equipped with a pantry...maybe in another life! But this is where I store all my canned items.
Since I shop at Costco, keeping this stocked is fairly simple. I know the canned food items that my family eats on a regular basis by heart and I always make sure I have an ample supply of all those items. See that lonely can of olives on the right side? Well, I've got it on my shopping list this week to buy another case of 8 this week to replenish it - even though it's not on the menu to eat olives any time soon. I never stock the pantry when I'm completely out of items. In fact, my ideal is to be about 2 or 3 cases deep of each item as my family can almost go through about that much in 3 months. But ya know, I'm not perfect and neither is my system but that's what's great is it doesn't require perfection!!
So, if you are trying to build your food storage, I'd definitely start here. Once your pantry is stocked with items that will take you about 3 months (give or take!) to consume, move forward (but then never let any canned item get to zero again!).
Next item on the list are my buckets. Now, I only store here what my family eats on a {pretty} regular basis. It seems kind of a waste to store food that you won't eat, let alone that you don't even know how to prepare! But that said, if your family doesn't consume wheat on a regular basis, don't despair! We're taking baby steps here!
What I have in buckets are white wheat, red wheat, long grain rice and regular rolled oats. But if your family doesn't currently eat those or know how to, find out what your family eats regularly that can be stored long term and store it. If your family doesn't eat anything that will store long term, I'd still get your supply of something and gradually learn how to incorporate it into your family's meals.
The picture may appear to be just a mass of random buckets but there is method to my madness! See all those colored lids? Those are called Gama Seal lids and in each of those buckets are my "open buckets." The Gama lid easily screws on and off making it easy to get into my buckets. When that buckets gets empty, I refill it with another bucket that has the oldest date written on the lid. But keep those empty buckets as you'll want to refill them! I do replace those white lids after I've opened a bucket as they don't re-seal.
Each column of buckets contains the same item as what's in my gama-lid bucket. I like to have 9 buckets of each - oats, white wheat, rice and red wheat. When I started, my goal was to have each family member have their own bucket of each grain (there are seven of us so that means 7 buckets of red wheat, 7 buckets of white wheat, 7 buckets of oats and 7 buckets of rice) but I've gradually built up to 9 total as I have the space.
When I run out of a bucket I place the empty bucket on top of my stack so I know exactly what needs to be refilled. I refill all empty buckets every 6 months (in Utah, during General Conference time which is April and October, all the stores have their food storage/bulk food on sale so this is when I like to replenish!). I buy my wheat from Bosch Kitchen Center (they have high quality wheat that I like) and my oats and rice from the LDS church's cannery (which doesn't go on sale but I still buy it at the same time as the rest). Costco also sells those items in bulk as well!
I like to use my white wheat to make whole-wheat pancakes or waffles (recipe found
HERE) and whole wheat muffins (recipe found
HERE) at least once a week for breakfast. I like to use my red wheat to make homemade bread (recipe found
HERE). I'll admit, I don't make bread as often as I'd like so it takes me the longest to go through my red wheat. I do have a wheat grinder (which should be a must on your food storage list if you intend to use your food storage!):
And a Bosch mixer:
I also do have a hand grinder for in the event during an emergency that we are without power:
It's also great for making your own cracked wheat cereal for breakfast! It's similar to oatmeal but a little more nutty and chewy - it's yum!
Not pictured in my buckets above (they are to the left of all these buckets) are a few random buckets which include white sugar (3 buckets total), white flour (3 buckets total), powdered milk (1 bucket total) and salt (1 small bucket). I also keep these stocked at all times.
Then lastly, I have my #10 can items.
These items I don't rotate often (okay, haven't yet!) with the exception of the beans that I canned myself (see how I canned all those
HERE). For those, I bought 25# bags of various kinds of beans my family eats (pinto, great northern (aka white), black, kidney, chickpeas (aka garbanzo beams), chili beans (aka small red beans) and lentils) and canned them using the LDS church's canner that I was able to check out at our local cannery. I have 1 open can of each type of bean. If you'd like to see some of my bean recipes, check them out
HERE.
The other #10 cans are mostly items I'd only use in an emergency (with the exception of the dried apple slices (those are SO good as a snack!) and the potato flakes which I use. I bought 12 #10 cans from Costco when they were on sale that contained 6 freeze-dried various fruits and 6 freeze-dried various vegetables. Then I bought 6 cans of freeze-dried meats (beef, ground beef and chicken). I also have whole eggs and powdered butter.
It's taken me probably 4 years to build this supply financially. Now that I have it, I just have to replace what we eat and it fits right into my budget. It tends to be about $200.00 every 6 months in April and October to replenish any food storage items we've gone through.
If you are feeling overwhelmed by building your food storage, just start small and gradually build your supply. Having a year's worth of food storage is peace of mind knowing my family would be provided for in an emergency!
Next up on the food storage agenda is my freezer!